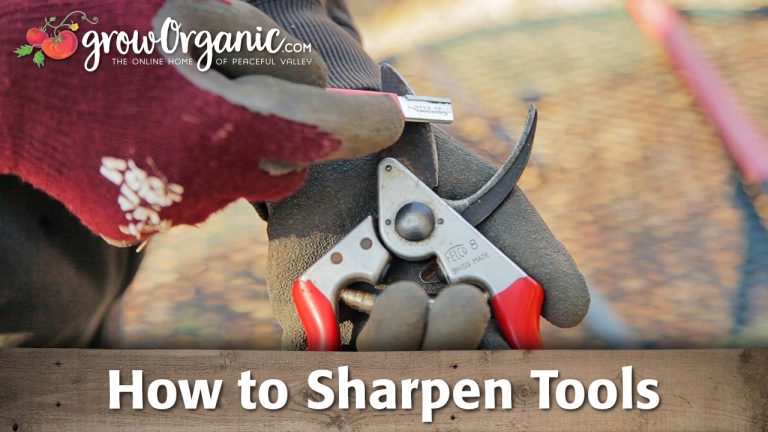

How to Sharpen Fiskars Pruners [A Complete Guide In 2025]
To sharpen Fiskars pruners, first clean the blades thoroughly with soapy water and a wire brush. Wear safety gloves and hold the sharpening stone or diamond file at a 20-25 degree angle against the blade’s beveled edge. Use steady strokes away from the cutting edge, about 10 times on each side. Wipe clean and apply light machine oil. Test the sharpness on a small branch, and repeat if needed.
Understanding Your Fiskars Pruners
Ever looked at your garden pruners and wondered why they’re not cutting as smoothly as they used to? Well, you’re not alone! Just like a chef’s knife, your Fiskars pruners need regular maintenance to keep them in tip-top shape. Let’s dive into everything you need to know about sharpening these essential gardening tools.
Types of Fiskars Pruners
Before we jump into the sharpening process, it’s important to understand what you’re working with. Fiskars offers several types of pruners, including bypass pruners (which work like scissors) and anvil pruners (which have one blade that meets a flat surface). Each type requires slightly different sharpening techniques, but don’t worry – I’ll walk you through it all!
Why Regular Sharpening Matters
Think of your pruners like your car – regular maintenance prevents bigger problems down the road. Sharp pruners make clean cuts that help plants heal faster and reduce the strain on your hands. They also make gardening more enjoyable (who doesn’t love a tool that works effortlessly?).
Essential Tools for Sharpening
Required Materials
- Sharpening stone or diamond file
- Cleaning solution
- Light machine oil
- Soft cloth
- Wire brush
- Screwdriver (if disassembly is needed)
Safety Equipment
You wouldn’t cook without an apron, right? Similarly, don’t sharpen without:
- Cut-resistant gloves
- Safety glasses
- Face mask (for metal dust)
Preparing Your Pruners for Sharpening
Cleaning and Disassembly
Before you start sharpening, your pruners need a good clean – just like you wouldn’t cook in a dirty kitchen! Remove any sap, dirt, or rust using warm soapy water and a wire brush. If your pruners have a bolt holding them together, you might want to loosen it, but complete disassembly isn’t always necessary.
Inspecting for Damage
Take a close look at your pruners – are there any chips, cracks, or severe rust spots? These issues might affect how you approach the sharpening process or whether sharpening is even the right solution.
Step-by-Step Sharpening Process
Finding the Correct Angle
Here’s where the magic happens! Hold your sharpening tool at approximately 20-25 degrees relative to the blade. Not sure what that looks like? Think of it as about the same angle as a quarter of a pizza slice.
Sharpening Technique
Using a Sharpening Stone
If you’re using a sharpening stone, start with the coarse side if your blade is quite dull. Apply steady, even strokes away from the cutting edge, as if you’re trying to slice a thin piece off the stone. After about 10 strokes, check your progress. Switch to the fine side of the stone for finishing.
Using a Diamond File
Diamond files are like the sports cars of sharpening tools – fast and efficient! Use light pressure and maintain that same 20-25 degree angle. The diamond file’s texture will do most of the work for you, so don’t press too hard.
Maintaining Your Sharpened Pruners

Post-Sharpening Care
After sharpening, wipe the blade clean and apply a light coat of oil – think of it as moisturizer for your pruners! This prevents rust and keeps the mechanism working smoothly.
Storage Tips
Store your pruners in a dry place, preferably hanging up or in a tool roll. Adding a drop of oil before storage is like tucking them in with a cozy blanket – it keeps them happy until their next use!
Troubleshooting Common Issues
- Blade won’t sharpen evenly? Check if you’re maintaining a consistent angle.
- Still not cutting well after sharpening? The spring might need adjustment.
- Blades moving stiffly? Time for cleaning and oiling.
- Visible nicks? You might need to start with a more aggressive sharpening tool.
When to Replace Instead of Sharpen
Sometimes, like an old car, repairs just aren’t worth it anymore. Consider replacement if:
- The blade has deep chips or cracks.
- The pivot point is severely worn.
- The handle is damaged or broken.
- The blade is too thin from multiple sharpenings.
Frequently Asked Questions
How often should I sharpen my Fiskars pruners?
Depending on usage, sharpen them every 3-6 months or when you notice they’re not cutting as cleanly as before.
Can I use a power tool to sharpen my pruners?
While possible, it’s not recommended as power tools can remove too much material too quickly and generate excess heat.
Should I disassemble my pruners completely for sharpening?
Usually, a basic cleaning and loosening of the pivot bolt is sufficient. Complete disassembly isn’t necessary unless there’s severe damage or rust.
What’s the best angle for sharpening Fiskars pruners?
A 20-25 degree angle typically works best for most Fiskars pruner models.
How do I know if my pruners need sharpening or replacement?
If the blades are just dull but otherwise intact, sharpen them. If there’s significant damage, rust, or wobbling, consider replacement.
Conclusion
Sharpening your Fiskars pruners isn’t just about maintenance – it’s about making your gardening experience more enjoyable and efficient. With regular care and proper technique, your pruners can provide years of reliable service. Remember, sharp tools make for happy gardening!