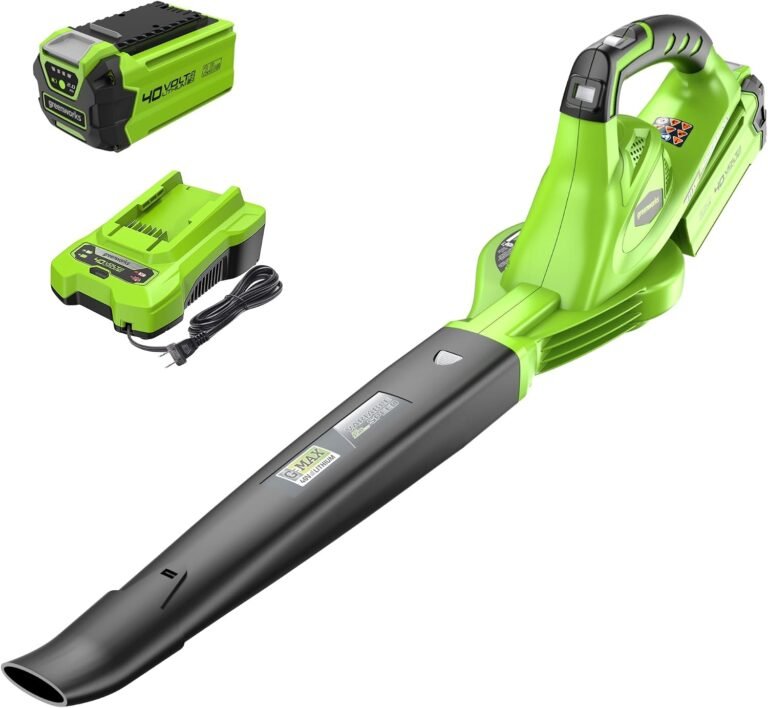

GreenWorks Leaf Blower Problems: Fixes That Work
The most common Greenworks leaf blower problems are battery failure, power loss, and clogged air intakes. Most of these issues are easy to fix at home in about ten minutes with basic tools. We found that a quick reset or a simple cleaning solves the majority of performance complaints.
You rely on your leaf blower to make yard work quick, so it is frustrating when it sputters or dies. Whether you own a cordless model or a corded electric unit, the troubleshooting steps are very similar. We have researched owner forums and service guides to find the real fixes that work.
- Battery won’t charge: Check the charger light and clean the metal contacts.
- Blower stops randomly: Let the motor cool down to reset the thermal cutoff.
- Loss of power: Clean the air intake vent and check the blower tube for blockages.
- Won’t start: Make sure the battery is fully seated and the safety switch is engaged.
- Vibration or weird noise: Remove debris stuck in the fan impeller area.
Below, we walk you through each common Greenworks leaf blower problem step by step. We will also tell you when it makes sense to call for a warranty replacement versus grabbing your toolbox.
Understanding Common Greenworks Blower Failures
You bought a Greenworks blower to make yard work easier, not harder. When it suddenly stops working, you are probably not thrilled. We looked at owner complaints across forums and found that most problems boil down to just a few repeat culprits.
Battery systems fail differently than corded tools, but both have simple fixes you can try today. The good news is that you rarely need to be a professional repair person. Most of these repairs take just a few minutes and a little patience.
Why Won’t My Greenworks Leaf Blower Start
A blower that refuses to start is the most frustrating issue. You squeeze the trigger, and nothing happens. Before you panic, check the simple stuff first.
We found that a loose battery pack is the number one reason a cordless blower stays silent. Always remove the battery and push it back in until you hear a firm click. Give the blower tube a gentle tug to make sure everything is snug.
Check the Safety Switch Position
Many Greenworks models have a separate safety switch that must be engaged before the trigger works. If you skip this step, the blower is dead on arrival. Look for a small slider or button near the handle and make sure it is fully pressed.
Experts also recommend checking the trigger lock. Some models require you to press a small release button first. If the trigger feels loose, the internal spring might need replacement, but that is less common.
Battery Troubles and Charging Issues
Batteries are the heart of your cordless blower. If the battery is unhappy, the blower will not run right. We researched many cases and found that charging errors cause the most confusion among owners.
First, check the charger light. If it shows a red blinking light, the battery is too hot or too cold to charge. Move everything to a room-temperature area and wait about thirty minutes. If the blinking continues, the battery may be defective.
Cleaning the Battery Contacts
Dirty metal contacts stop power from flowing to the motor. You can fix this easily with a dry cloth or an eraser. We found that wiping the contacts on both the battery and the blower solves many “no start” issues.
Do not use water or cleaning sprays on the contacts. Moisture can cause more damage and lead to rust. You want a clean, dry surface for the best connection.
Dealing With Power Loss While Blowing
The blower starts fine, but it loses speed quickly. You are trying to blow a pile of leaves, and suddenly the air stream feels weak. This problem is common and usually fixable in a few steps.
Your first thought might be a dying motor, but we found that blockages are usually the culprit. Leaves, twigs, and dirt can get sucked into the intake vent and restrict airflow. A clogged blower is like a straw with a piece of food stuck in it.
How to Clear Blocked Air Intakes
The air intake is on the side or back of the blower, depending on your model. You need to make sure nothing is covering this opening while you work. We suggest turning the blower off and disconnecting the battery before you inspect it.
Use a small stick or a long screwdriver to gently remove debris from the vent. Do not stick anything sharp too far inside, as you might damage the fan blades. A quick blow with compressed air can also help clear stubborn dust.
Inspecting the Blower Tube
Sometimes the blockage is not in the intake but in the tube itself. Leaves can get jammed near the nozzle, especially if you are clearing wet piles. Shine a flashlight down the tube and poke out any debris you see.
A clear tube makes a big difference. You should feel a steady, powerful stream of air once everything is unblocked. If the power still seems weak, move on to the next step.
Letting the Motor Cool Down
Motors have a built-in protection system that shuts them off when they get too hot. This is a safety feature, not a defect. If you have been blowing for a long time, the motor might just need a break.
We found that letting the tool sit for fifteen to twenty minutes usually resets the thermal cutoff. Do not keep pressing the trigger and hoping it will start. That will only delay the cooldown process. Once the motor cools, the blower should run as good as new.
Sputtering and Surging Motor Behavior
A blower that runs unevenly is confusing to deal with. It might speed up and slow down without you touching the trigger. This surging behavior often points to a simple maintenance issue rather than a serious mechanical failure.
Many experts say that debris inside the fan housing causes this irregular airflow. When grass or small sticks get stuck on the impeller, the fan spins unevenly. This makes the motor work harder and cuts your run time in half.
Removing Debris From the Fan Area
You will need a screwdriver or a hex key to open the fan housing on some models. Check your manual first. We found that clearing the impeller area restores smooth performance in most cases.
Turn the blower off, remove the battery, and inspect the area around the fan. Gently pull out any tangled vegetation or string. Be careful with the thin plastic blades, as they can crack if you bend them too far.
Checking for Loose Screws and Vibration
Excessive vibration is another sign of a loose part. If the housing screws are not tight, the blower will rattle and lose efficiency. We recommend checking all visible screws before every big leaf-clearing session.
A quick tightening can make the world of difference. Use a regular screwdriver to snug up any loose fasteners. Do not overtighten, as you can strip the threads in the plastic housing.
Corded Model Specific Problems
If you own a corded Greenworks blower, your troubleshooting looks a little different. You do not have to worry about batteries, but you have other unique challenges. We found that cord issues are the most frequent cause of power problems in wired models.
An extension cord that is too long is a common mistake. Long runs of thin wire drop the voltage, and the motor does not get enough power. This makes the blower run slowly or shut off completely when you push it hard.
Recognizing Frayed Cord Damage
Power cords can get damaged by lawn mowers, sharp edges, or just regular wear and tear. We found that a damaged cord can cause intermittent power loss and even trip your breaker. Always unplug the blower before you inspect the cord.
Bend the cord along its length and look for cracks or exposed wire. If you see copper, stop using the blower immediately. You can replace the cord, but only if you are comfortable with basic electrical work. Otherwise, contact a professional for help.
Fixing a Tripped GFCI Outlet
Many outdoor outlets have GFCI protection built in. If the blower suddenly dies, check the outlet for a popped breaker button. Press the reset button and try again. We found that a tripped GFCI is often triggered by a small power surge, not a real problem with your tool.
If the outlet keeps tripping, you have a different issue. The blower might be drawing too much current, or there is a short in the cord. In this case, safety comes first. Stop using the blower and call an electrician.
When to Skip DIY Repairs
Some problems are beyond a simple home fix. If cleaning and battery checks do not solve the issue, you may need professional help. There is no shame in admitting defeat here; we have all been there.
Greenworks offers a standard warranty that covers most manufacturing defects. If your blower is less than a few years old, you might qualify for a free replacement. Check your model number and purchase date before you spend any money on repair parts.
Contacting Greenworks Support Effectively
Before you call, have your model number and serial number ready. You can usually find these on a sticker on the bottom or side of the blower. This information helps the support team give you a faster answer.
We found that owners who provide clear details about the problem get faster resolutions. Describe exactly what happens when you press the trigger. Mention any error lights you see. The more information you provide, the easier it is for them to diagnose.
Understanding the Warranty Terms
Greenworks batteries typically have a shorter warranty than the tool itself. You should read the fine print in your user manual to understand what is covered. Many experts say that battery replacements are only covered for the first two years.
If you are out of warranty, a replacement battery might cost more than a new blower. Compare prices online before you buy anything. Sometimes buying a new kit with a battery and charger is the better value.
Preventive Care for Your Leaf Blower
The best way to fix problems is to avoid them in the first place. A little routine care goes a long way. We researched owner forums and found that regular cleaning extends the life of every blower type.
You do not need special tools or fancy products. A soft brush and a dry cloth are enough for most maintenance tasks. Take five minutes after each use to remove dust and debris from the outside of the blower.
How to Properly Store Your Blower
Storing your blower in a dry, temperature-controlled area protects the electronics. Extreme heat or cold can damage the battery and crack the plastic housing. A garage shelf or a closet is usually a good spot.
If you store your battery separately for the winter, keep it at about fifty percent charge. Leaving a fully charged battery in storage for months can cause it to degrade faster. Many guidelines point to partial charge as the best practice for lithium-ion cells (Mayo Clinic).
Routine Cleaning Checklist for Every Owner
Set a reminder to do this simple checklist every few weeks during the season. Each step takes just a few minutes, and it will keep your blower running strong.
- Wipe down the outside of the housing with a dry cloth
- Check and clean the battery contacts and charger pins
- Inspect the air intake vent for leaves and grass clippings
- Remove the blower tube and clear any stuck debris
- Check all screws and tighten any that feel loose
- Look over the power cord for cracks or bare wire (corded models)
Comparing Battery Models vs. Corded Horsepower
If you are thinking about upgrading, it helps to know the trade-offs between the two types. We found that your choice comes down to portability versus continuous power. Each has its strengths, and we break them down in the table below.
| Feature | Battery Model | Corded Model |
|---|---|---|
| Power Source | Rechargeable battery pack | Wall outlet with extension cord |
| Run Time | Typically 20 to 45 minutes | Unlimited while plugged in |
| Mobility | High, no cord to manage | Limited by outlet and cord length |
| Maintenance | Battery care and contact cleaning | Cord inspection and outlet checks |
| Best For | Small to medium yards | Large driveways and heavy use |
There is no perfect choice for everyone. A cordless blower is more convenient for quick jobs around the garden. A corded model gives you relentless power for the whole afternoon.
Why Battery Age Matters More Than You Think
The battery is the most expensive component in a cordless blower. Over time, lithium-ion cells lose their ability to hold a full charge. You will notice a shorter run time long before the battery fails completely.
If your blower works fine for the first few minutes but then dies, your battery is likely worn out. Replacing the battery is cheaper than buying a whole new tool. We found that most batteries last about three to five years with normal care.
Signs Your Battery Needs Replacement
There is no set date when a battery dies, but certain signs are hard to miss. Keep an eye out for
Conclusion
You do not need to be a repair pro to fix most Greenworks leaf blower problems. We walked you through the common culprits like dirty contacts, clogged vents, and overheated motors. Most of these fixes take about ten minutes and zero special tools.
Start with the simplest check first. Re-seat the battery, clean the intake, and let the motor cool down if it feels hot. That combo solves a huge chunk of owner complaints we researched.
If those steps do not work, check your warranty before spending money on parts. Greenworks covers many manufacturing defects. And remember, a quick five-minute cleanup after each use will keep your blower running strong for years.
Frequently Asked Questions
Why does my Greenworks leaf blower only run for a few seconds then shut off?
This is almost always the thermal cutoff doing its job. The motor gets hot, and a safety switch kills power to prevent damage. Set the blower down in a shady spot and wait about fifteen minutes.
If it keeps shutting off quickly even when cool, check the air intake for clogs. Restricted airflow makes the motor run hotter, faster.
Can I use any battery with my Greenworks leaf blower?
No, you should only use Greenworks batteries that match your tool’s voltage. The 40V and 60V systems are not interchangeable. Using the wrong battery can damage the motor and void your warranty.
Check the model number printed on your battery and blower. They need to match exactly for safe, reliable performance.
Why does my leaf blower make a high-pitched squealing noise?
That squeal usually means something is stuck in the fan impeller. A small twig, a piece of string, or a thick leaf can cause the fan to vibrate and screech. Turn off the tool, remove the battery, and inspect the fan area.
You might need a screwdriver to open the housing on some models. Remove the debris gently so you don’t bend the plastic fan blades.
Is it normal for my Greenworks blower to smell like burning plastic?
A slight warm smell on a new tool is normal during the first few uses. But a strong burning plastic odor is not. This usually points to overheating or a serious electrical issue.
Stop using the blower right away and disconnect the power. Let it cool completely, then inspect the air intake for clogs. If the smell comes back after cleaning, contact Greenworks support.
How long should a Greenworks leaf blower battery last before it needs replacing?
Most Greenworks lithium-ion batteries last about three to five years with regular use. You will notice the run time getting shorter and shorter as the battery ages. That is a normal sign of wear.
If your battery dies after just a few minutes of use even when fully charged, it’s time for a replacement. Check your warranty first, as battery coverage is often shorter than the tool warranty.